This is a popular request that I’ve recently modified, thanks to the recommendation of a colleague, to be responsive to different device or browser sizes. By default, SharePoint lists respond to their viewer’s size but once customized with a fixed pixel width will lose that feature. This solution utilizes percentages so you can create column widths ideal for any screen.
Update 6/18/19: I’ve recently shared how to adjust widths using CSS and it covers standard AND datasheet views, while the method below is written only for standard views (but could certainly be adapted for datasheet, I imagine).
This is a simple solution to implement. I would recommend saving the script below as a .js file in your Site Assets or Scripts folder that we’ll then call from a Content Editor Web Part (CEWP) on our list’s page. Here are the specific steps to do so:
-
-
- Create new ListNameColumnWidth.js file in your Site Assets folder (using SharePoint Designer as seen here).

- You can also use any text program such as notepad to create a .js file as long as you are sure to save the file as .js instead of .txt. If you do this, drag and drop your new .js file once created into your SiteAssets folder via the browser (you can edit it there in browser as well.
- Paste this script into your new file
[code]
<script src=”https://ajax.googleapis.com/ajax/libs/jquery/1.11.0/jquery.min.js” type=”text/javascript”>
</script>
<script type=”text/javascript”>
$(function(){
$(“div.ms-vh-div:contains(‘Column1’)”).css(“width”, “25%”);
$(“div.ms-vh-div:contains(‘Column2’)”).css(“width”, “20%”);
$(“div.ms-vh-div:contains(‘Column3’)”).css(“width”, “15%”);
$(“div.ms-vh-div:contains(‘Column4’)”).css(“width”, “15%”);
$(“div.ms-vh-div:contains(‘Column5’)”).css(“width”, “25%”);
});
</script>
[/code] - Edit column names in the script to match column names in the list
- You can copy and paste as many of the lines beginning with the $ and ending with the “); as you need for your columns. Just make sure you past them before the }); and closing script tag.
- Adjust percentages as appropriate (ideally utilizing all columns and making sure the total equals 100%)
- Fixed vs responsive: If you want fixed widths use ##px instead of ##%
- Minimum widths: No matter what you put for a column width, a column cannot be smaller than the largest word in the column because a word will not break and wrap by default. For example, email addresses are considered a single word so your column cannot be smaller than the length of the address. Chamberlain,Nate (no space) would be considered a single word as well.
- Save script
- On your list’s page, go to Settings –> Edit Page

- Add a Content Editor Web Part from the Media and Content category
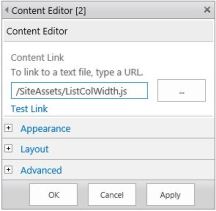
- Reference your new script in the CEWP settings

- Click OK or Apply
- Click “Stop Editing” from the ribbon or “Save”

- Create new ListNameColumnWidth.js file in your Site Assets folder (using SharePoint Designer as seen here).
-
Good luck!

One Reply to “Adjust SharePoint list column widths in classic view using jQuery”