It’s often helpful in our on-prem environment to be able to run IE as a test user with general permissions instead of my admin permissions. This possibility makes it so I don’t need to remote to another machine or log out and in with another account just for a simple check.
If you have a shortcut to IE on your desktop (not your task bar), skip ahead to step two.
Search “IE” from the start menu, right click and select “Open File Location”
2. Hold “Shift” on your keyboard and right-click the Internet Explorer icon. Select “run as different user”
3. Enter the credentials for the second user (your screen/prompt may look different) and click OK/Login. In some cases, you may be prompted to enter these more than once.
IE will now run as if the other user is logged in.
If you want to see which groups a user belongs to, or how an individual is granted (or restricted) access to a particular site or resource, use the “Check permissions” button in Site Settings –> Site Permissions (or any advanced permissions page).
SharePoint 2016 example of checking permissionsSharePoint Online example of checking permissions (see specific allowances)
Note: Screenshots and steps from a 2016 environment
There may be times when you have AD accounts showing up in search results that you can’t delete, but need to hide from results. The following sections will guide you through removing specific profiles from your people search results.
Steps:
Create a mapped property for user profiles
Use the new property at least once
Start a full crawl of people source
Create a managed property mapped to your new user property
Start a full crawl of site source
Edit the query on the people search results page
(optional) If you have “People Results” as “Promoted Results” or “Ranked Result Blocks”
1. Create a mapped property for user profiles
From Central admin, click on “Manage service applications”
Select “user profile service application”
Click “Manage User Properties” under “People”
Select “New Property”
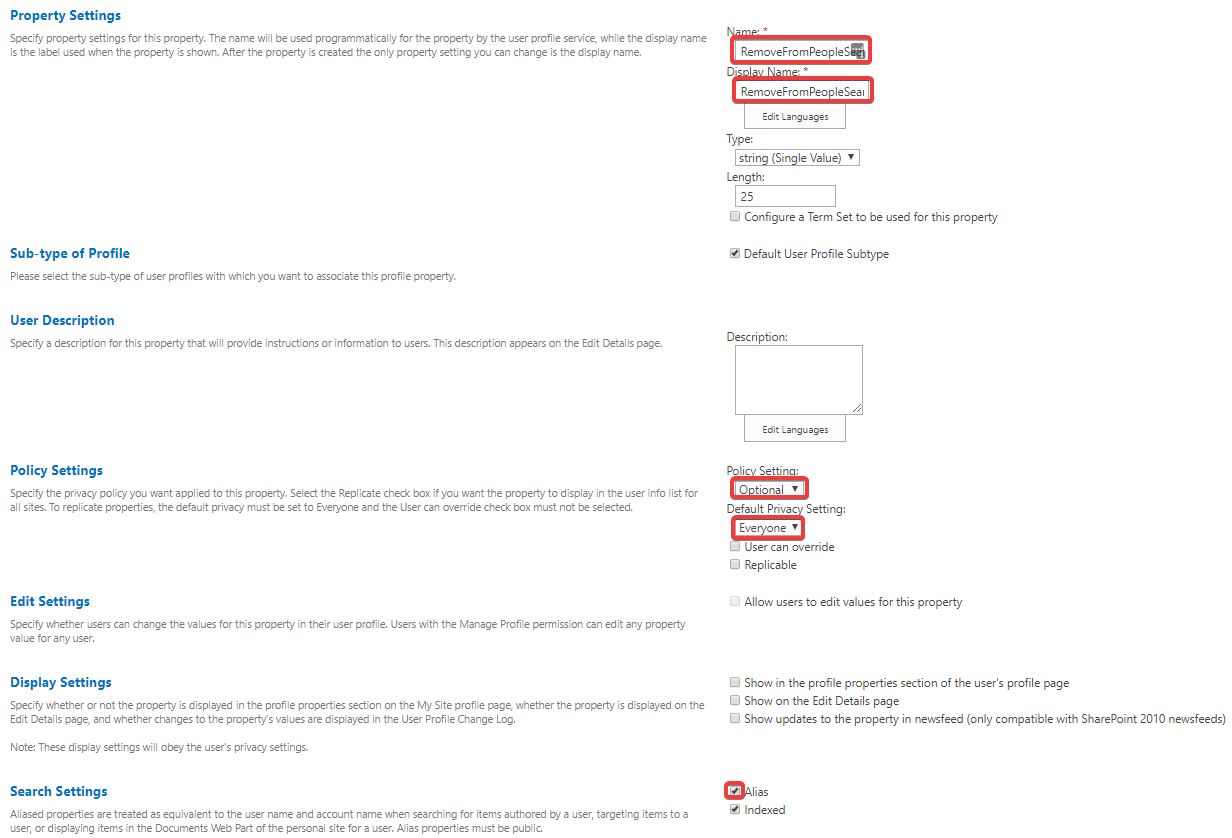
Set the new properties settings as follows:
Name and display name: RemoveFromPeopleSearch
Policy Setting: Optional
Default Privacy Setting: Everyone
Search settings, Alias: checked
Click to enlarge
Click OK.
2. Use the new property at least once
For the rest to work, you’ll need to mark at least one user profile to not show up in search. I did this by adding a “1” to the property we just created for a user I wished to remove from results.
Back under “User profile service application” (Central admin –> Manage service applications –> “User profile service application”) click on “Manage user profiles.”
Search for and edit the profile of who you’d like to remove from search results.
4. Edit the query on the people search results page
Once your crawl is finished (may take a while), you’ll want to go to your people search results page and “Edit page.”
Click to enlarge
Edit the “Results” web part
In the menu that appears on the right, select “Change Query.”
If you’re not in advanced mode, switch to advanced mode. Then expand the “property filter” dropdown and select “show all managed properties.”
Try the dropdown again, and now you’ll see your new property listed. Select it and click “OK
Set properties as follows and click “Add property filter”
Click OK
Click “Apply” on the web part menu
Click “Save” and publish (if checked out)
5. (optional) If you have “People Results” as “Promoted Results” or “Ranked Result Blocks”
If you have people results outside your regular people search (such as a promoted result block in Local SharePoint Results) you’ll just need to be sure to also add the RemoveFromPeopleSearch<>1 string to the end of your query rule’s query.
Query rules can be accessed through central admin (manage service applications –> search service application –> query rules) or from Site Settings –> Query rules depending on where you initially setup your query rules/promoted results.
via site settings
via central admin
Edit the query rule in question, click “edit” next to the result block that’s relevant, then “Launch Query Builder” to be able to add the RemoveFromPeopleSearch<>1 string to your query.
Applies to SharePoint 2016, can be adapted for O365
If you’re connecting to an external list of significant size, you may run into the following error:
Database Connector has throttled the response. The response from database contains more than ‘2000’ rows. The maximum number of rows that can be read through Database Connector is ‘2000’. The limit can be changed via the ‘Set-SPBusinessDataCatalogThrottleConfig’ cmdlet.
1. Log into your SharePoint server
2. Open your SharePoint 2016 Management Shell as administrator (right-click, run as administrator)
3. Connect to your site
Connect-Site -url https://sharepoint.contoso.com
4. Get ALL service application Proxy IDs (you’ll need this in a later step)
Get-SPServiceApplicationProxy
5. Note the ID of the “Business Data Con…” application
6. Set a new variable “$serviceapp” to that app using the ID you noted as its identity
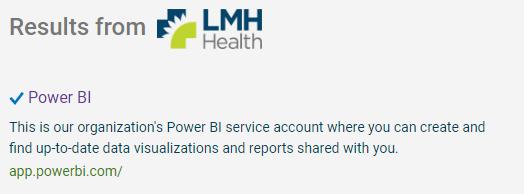
If someone searches in SharePoint for “Power BI,” chances are they aren’t looking for a document from 2016 that happens to mention the phrase “Power BI.”
Using out-of-the-box search reports you can come to understand what phrases are being searched (and abandoned) on your intranet, then improve search by promoting/suggesting results you think your users are actually seeking.
I’m going to use my “Power BI” example. If a user searches Power BI on my dev environment, they get these as the top three results. The first two are SharePoint link lists (like promoted links or otherwise) and the third is just a document about embedding Power BI reports. None take you
Let’s make it easier to get directly to our app.powerbi.com portal when searched on the intranet.
Go to central admin –> Manage service applications
Select “Search service application”
Select Query Rules from the left nav
Select “Local SharePoint Results” from the first dropdown
Click “New Query Rule”
Name the rule and enter semi-colon separated phrases you want to trigger our promoted result
Click “Add promoted result”
Complete the form, keeping in mind that the “Title” and “Description” are what will appear in results when searched. Click Save.
Click Save again. Changes are immediate, and your promoted result will appear FIRST in results with a checkmark icon to indicate it’s promoted/suggested
Test your search
Note: If you use SharePoint Online, your navigation to the query rules is a bit different but still starts in central admin. The rest of the steps are the same.
There are three possible causes I’m aware of that you should check if you receive this message:
Central admin settings not configured properly
Site collection settings not configured properly
You’re using a Project Web App (PWA) site template and can only fix this on SharePoint Server
I’ll cover the solutions for each in the same order:
Central admin
Go to central admin –> manage web applications
Select the web app on which you received the error and select “SharePoint Designer” from the general settings drop-down. Make sure the first box is checked and click “OK.”
Site collection settings
Go to site settings –> SharePoint Designer Settings (under Site Collection Administration)
Make sure “Enable SharePoint Designer” is checked and click OK
Project web app template issue
Log in to a SharePoint server and go to C:\Program Files\Common Files\microsoft shared\Web Server Extensions\16\TEMPLATE\SiteTemplates\PWA\XML
Open the ONET XML file in a text editor like NotePad
Search for “webdesign” (Ctrl+F to open search) and delete the following property:
DisableWebDesignFeatures="wdfeditpages"
Perform an IIS reset (run SharePoint management shell as administrator)
You may need to repeat these steps on multiple servers if you have multiple web front end servers. You can just copy the ONET file and overwrite the same file on the other servers in the same location. Don’t forget to do an IIS reset afterward on each.
Close and re-open your Project Web App site in SharePoint Designer and you should now be able to edit as you do with other sites.
Want to make your “search everything” really search everything? Add bing results to your SharePoint search results. You can do this as a result block (added to your results column) or as a separate results column as seen in the example at the bottom of this post.
Bing supports OpenSearch protocol while Google does not. This allows us to utilize Bing’s search engine from within our SharePoint environments (server or online). If you’re using SharePoint Server (on-prem), you’ll need to provide a proxy server for crawling and federation in central admin –> search administration.
The rest of the steps are the same for either online or on-prem:
Create result source
Create query rule
And you can do a similar process for a single site collection (through site collection settings) but I’ll be demonstrating this through central admin (for all site collections).
Create result source
From central admin –> search administration, click on “Result sources” under “Queries and Results”
Click “New Result Source”
Set the settings as follows, pasting https://www.bing.com/search?q={searchTerms}&format=rss&Market=en-us for the Source URL.
Leave credentials as “anonymous” and click “Save”
Create query rule
Click on “Query Rules” from the left nav in Search Administration
Set context to “Local SharePoint Results” and click “New Query Rule”
Name it “Bing Query Rule” and click “Remove Condition” since we want Bing to be included in every query
Click “Add Result Block” and set as follows:
Optional settings:
You can set the “context” settings to apply this rule to ALL result sources, or just to the Local SharePoint Results (default)
You can edit the result block so that a “more” link appears. Link it to https://www.bing.com/search?q={subjectTerms} to allow users to leave SharePoint and see even more results from Bing
Choose whether you want the “Bing results” block to appear at the top of SharePoint results or ranked. I recommend ranked if you’re only wishing to supplement your search for the occasional user who thinks SharePoint search is internet search.
Implementation
There are too many ways to implement this new result source to share here, but use your imagination. Each “search results” web part can be configured to use or ignore query rules.
In this example, we’re using query rules and promoting the top two bing results to the top of our SharePoint results with a “more” link that would take us out to Bing. This method requires the result source and query rule.
In this example, we’ve created a third column on our search results page that shows the top Bing results alongside our top SharePoint results. You don’t need a query rule for this, just the added result source and a separate web part.
So finally “Search everything” can really “search everything.”
Health care or healthcare? Doctor or physician? Emergency room or ER?
No matter which terms, spellings or abbreviations a SharePoint search user uses, they’re searching for something specific. By utilizing a simple thesaurus, we can make sure that a user searching for “ER” also gets results that include “emergency room.”
How to create a thesaurus
Note: Not currently available in SharePoint online/O365. But should be supported in 2013/2016/2019.
Create/open a new text file using Notepad
One the top line of the file type “Key,Synonym,Language”
On each following line, insert the initial search term (key) followed by the synonym SharePoint should also search for when the “key” is used. End each with an ISO 639-1 language code for your region (optional). Separate each component with a comma (no spaces) as seen below.
In the previous example, you’ll notice we have to do each twice by switching the order so that whether a user searches “Information Technology” or “IT” they get results including both.
If you’re including commonly misspelled words, you may wish not to provide the inverse/second option – just use the misspelling as the key with the correct word as the synonym. But if you’re afraid your content and results may also have the misspelling, I would include both (or fix the misspellings in your content).
The thesaurus is not case-sensitive
Don’t include quotations around multi-word phrases. The commas are all you need.
Save it to a server/network location such as \\Server\Documents\thesaurus.csv (include .csv at the end of the name) and make sure its encoding is set to UTF-8
What to include
If your industry is like most others, you have many acronyms – that’s a good starting place for building a thesaurus. Your thesaurus can contain considerations such as:
Variations of a word (radiology, radiologist, radiologic, radiological)
Once you’ve compiled your basic thesaurus from going through the above suggestions, you should analyze the search reports provided by SharePoint to see what people have been actually searching but not finding. Then use those search terms to further enhance your thesaurus.
For example, when my governance committee analyzed search reports, we came up with people searching for “KU” (our local University and neighboring health system) and added “University of Kansas” to our thesaurus.
Import your completed thesaurus
Note: Each time you import, it overwrites the existing thesaurus. I recommend updating the same file you’ve created with new lines rather than recreating it multiple times. Also be sure to save the file in a place others can access and update in your absence. You won’t be able to export it later.
Repeat these steps each time you want to update the thesaurus:
Note: You must be a search service application administrator to import the thesaurus.
Log in to a SharePoint server and run PowerShell with the SharePoint snap-in or just use the SharePoint management shell (recommended). Either way, run as administrator.
If successful, you’ll see the following confirmation:
Test your work!
The changes should be almost instant, with no need to perform any crawls. Here’s an example of how in our search “med staff” now also searches for “medical staff”.
I love SharePoint’s Content Query Web Part (CQWP) – but if you’re missing a feature in your site collection(s), you may not have it! Luckily you can get it back in just four clicks.
Go to Site Settings
Click “Site Collection Features” under “Site Collection Administration” (Note: Must have full control or site collection administrator permissions to see this option)
Activate “SharePoint Server Publishing Infrastructure“
Now your CQWP should be available as a web part under Content Rollup.
If you need to activate the SharePoint Server Publishing Infrastructure across all site collections in a web app, I recommend checking out Salaudeen Rajack’s site, SharePointDiary.com, for instructions on doing this via PowerShell.