I recently tried to use the “Populate a Microsoft Word template” step in Microsoft Flow (currently in preview) to insert text into content controls, but ran into the error above.
The selected file doesn’t contain template elements.
The issue was that my content controls in the template were of rich text format and date. This preview step currently only supports plain text, combo box, and dropdown content controls.
Plain text, combo box, and drop down are the only supported content controls as of the publishing of this post.
So for all of your text fields, make sure you use the correct (plain text) control:
Once I replaced my rich text content controls with plain text, the content controls showed up in Flow as options for populating:
To keep this organized, I recommend giving each content control a title (in its properties) so you can easily identify each field when in Flow (select content control, then “Properties” from developer tab).
Remember, you’ll only see supported content type fields in Flow. Even if you have a date content control, you won’t be able to populate it using Flow.
Note: Screenshots and steps from a 2016 environment
There may be times when you have AD accounts showing up in search results that you can’t delete, but need to hide from results. The following sections will guide you through removing specific profiles from your people search results.
Steps:
Create a mapped property for user profiles
Use the new property at least once
Start a full crawl of people source
Create a managed property mapped to your new user property
Start a full crawl of site source
Edit the query on the people search results page
(optional) If you have “People Results” as “Promoted Results” or “Ranked Result Blocks”
1. Create a mapped property for user profiles
From Central admin, click on “Manage service applications”
Select “user profile service application”
Click “Manage User Properties” under “People”
Select “New Property”
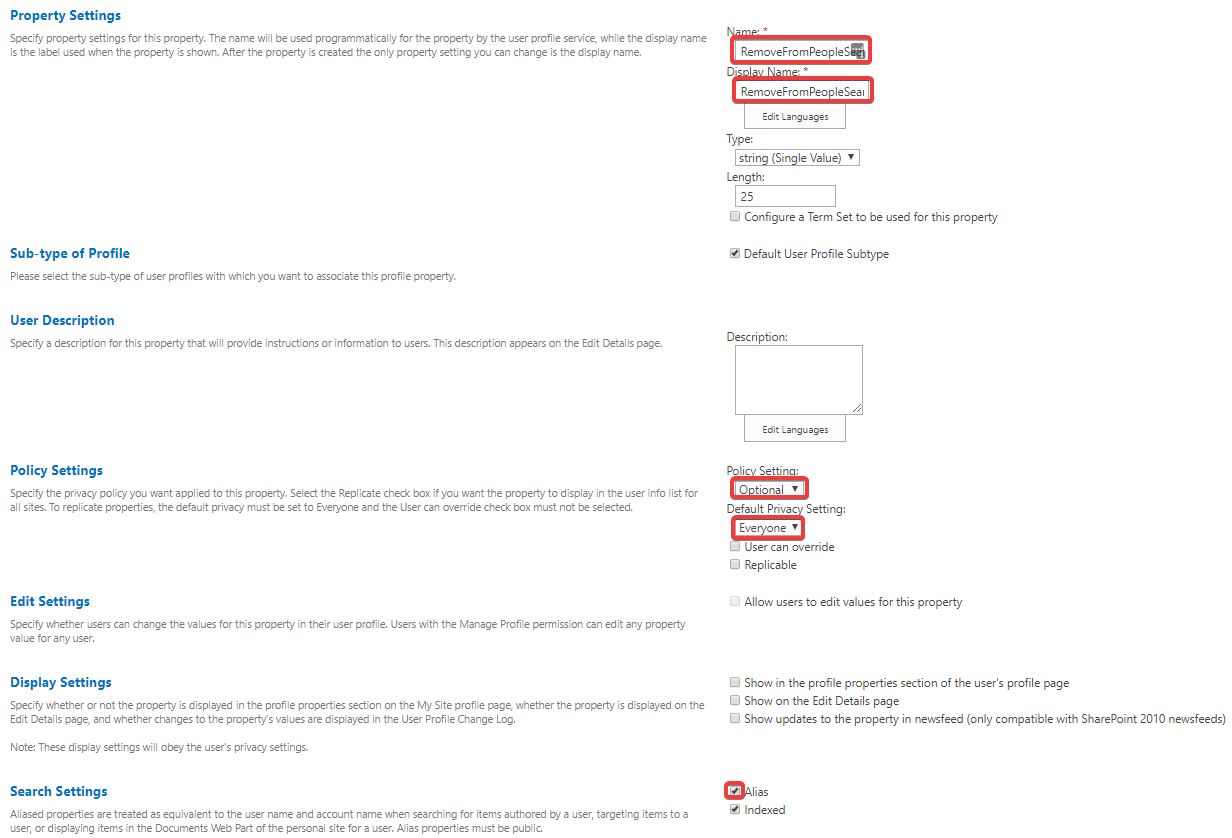
Set the new properties settings as follows:
Name and display name: RemoveFromPeopleSearch
Policy Setting: Optional
Default Privacy Setting: Everyone
Search settings, Alias: checked
Click to enlarge
Click OK.
2. Use the new property at least once
For the rest to work, you’ll need to mark at least one user profile to not show up in search. I did this by adding a “1” to the property we just created for a user I wished to remove from results.
Back under “User profile service application” (Central admin –> Manage service applications –> “User profile service application”) click on “Manage user profiles.”
Search for and edit the profile of who you’d like to remove from search results.
4. Edit the query on the people search results page
Once your crawl is finished (may take a while), you’ll want to go to your people search results page and “Edit page.”
Click to enlarge
Edit the “Results” web part
In the menu that appears on the right, select “Change Query.”
If you’re not in advanced mode, switch to advanced mode. Then expand the “property filter” dropdown and select “show all managed properties.”
Try the dropdown again, and now you’ll see your new property listed. Select it and click “OK
Set properties as follows and click “Add property filter”
Click OK
Click “Apply” on the web part menu
Click “Save” and publish (if checked out)
5. (optional) If you have “People Results” as “Promoted Results” or “Ranked Result Blocks”
If you have people results outside your regular people search (such as a promoted result block in Local SharePoint Results) you’ll just need to be sure to also add the RemoveFromPeopleSearch<>1 string to the end of your query rule’s query.
Query rules can be accessed through central admin (manage service applications –> search service application –> query rules) or from Site Settings –> Query rules depending on where you initially setup your query rules/promoted results.
via site settings
via central admin
Edit the query rule in question, click “edit” next to the result block that’s relevant, then “Launch Query Builder” to be able to add the RemoveFromPeopleSearch<>1 string to your query.
Spam is no joke. But when we educate users about it, we can have a little fun. A few months ago, my director sent out an email with the subject line “Spam on the rise” which I felt needed a little cinematic pizzazz. Without further ado I give you Spam on the Rise, ready for your PowerPoint slides or digital resources.
In both modern and classic SharePoint experiences, you can navigate to any discussion board, list, or library and set a custom alert just for you (or for others if you’re an admin) to get emails on new items, modifications, and more. All of the setup and management guidance below is classic, but modern is almost exactly the same except for how you initially access the “Alert me” options.
Set up a new alert
First, navigate to the list or library. Once there, you’ll see “Files/Items” and “Library/List” at the top. In the example below, we’re setting an alert on a document library so our options are “Files” and “Library.” Click the second option for the library, then “Alert Me.”
Select “Set alert on this library/list”
In the first part of the dialog, choose the Subject line of the email notifications (Alert Title), who should get it (just you if non-admin), and how they should get it. Your administrators may not have text messaging set up, so that may not be an available option.
Finally, choose what you care about (new items, modifications, deletions), the context/criteria for notifications, and how frequently you want emails (immediately, daily, or weekly). I find the daily option is great for discussion boards so users aren’t overwhelmed with back and forth discussion and can instead read a digest and catch up in a single email.
Click OK.
When ribbon menu isn’t there (classic)
Sometimes when you’re on a page with multiple web parts, you won’t see the Files/Library or Items/List menu options. This is because you need to “select” the relevant web part on the page by clicking in “white space” on the web part. The ribbon menu should then appear. And unless settings were changed by your site owner, you can sometimes click the title of the web part to go to just that app where you’ll see the menu as well.
Modify existing alert (end-user)
From the email notifications you receive, you can just click “Modify my alert settings” to see all alerts you have on that particular site, and be able to delete them or edit the settings.
You can also get there the same way we started. Ribbon menu –> List/Library –> Alert Me –> Manage my alerts
Manage all user alerts (admin)
Go to site settings
Under “Site administration” select “User alerts”
Choose for whom you’re modifying/deleting the alert(s) and click Update
You’ll now see all alerts that user has set up on that site (or alerts someone set up on their behalf). From here, you can delete any unwanted alerts, or report back to the user or interested party on frequency and topics/lists with alerts.
Delete your oldest items, and use filters to further narrow results
Filter for items you were CC’d on
Filter to items with attachments
Filter to unread/read
Delete unused folder contents, auto-email folders, or rule-based folders’ contents
Empty deleted items folder
Delete your largest items
Go to File –> Cleanup tools –> Mailbox Cleanup –> Set size filter and click Find
When the advanced search opens, add any additional filters and search. When you’re ready, click the top result, use Ctrl+A to select all results, right-click, and Delete. You may need to repeat the “Find Now, select all, delete” process depending on how many results you have.
Delete your oldest items
Similar to above, just change the “size” find option to the “days old” option.
Because you have delete in “batches,” it may be quicker to filter your main view as opposed to using the cleanup tool.
From your main Outlook screen, go to view –> view settings
Click “filter”
Configure settings for your filter, such as only messages you were copied on, or those with attachments. Click OK when ready.
Select all results (Ctrl+A), right-click and Delete.
Delete all of a certain folder’s contents
Click Folder –> Delete all to delete all items in a folder (perhaps you had a temporary project-based folder or a rule that sent generic or auto-emails to a specific folder).
Empty your deleted items folder contents
Now that you’ve filled your deleted items, let’s empty it too!
Go to File –> Cleanup tools –> Empty Deleted items folder –> Yes
A colleague of mine from LMH Health, Andrew Brookens, and I set out to deliver an hour’s worth of efficiency hacks using OneNote and Outlook this week. It was the first time we’d tried such a thing, and it was a hot topic. We had 40+ show up in person, and a few people online have asked for handouts or recordings so I’m sharing it all here.
We knew we were setting out to share a lot of demo, and a lot of info from TWO products in FIVE topics in an hour or less. So we devised a handout that would help attendees along the way, and after. You can download it below. In-person attendees also got free access to my OneNote 101 7-day email course.
Because we don’t all have an hour to watch the recording, Andrew and I agreed that sharing smaller, digestible videos would probably work best for busy professionals on the go. Here are brief teaser videos introducing each of our five concepts:
When you fail at something, you have a few choices and it’s perfectly natural to want to spend time doing a bit of each.
Dwell and be miserable; where’s the ice cream?
Move on; pretend it never happened
Move on, but harvest any useful bits of knowledge from the experience
The fact of the matter is that when we fail, we still gain something no matter how painful the failure was. Failure provides an opportunity to grow, and awakens a mental “trigger” that helps us avoid failing in the same way twice.
In my book Rise of the Advocates, I detail a story from my first job working at Dairy Queen. I was making my first banana split for a customer and it was beautiful. I was so proud of it, and honored that my supervisor let me even attempt such an intricate treat.
When I handed the masterpiece to the customer waiting in his car, he immediately held it up to the car’s dome light and asked, “Where’s the banana?” I had forgotten the banana – in the banana split.
It’s a mistake I didn’t make twice, and a failure that taught me to review instructions before starting, double-check my work, and even to ask for help when attempting something new. And while this is a low-risk, nearly harmless failure, the process of response and growth is the same as high-risk failures.
It can be difficult to immediately look upon any failure with even a remote sense of gratitude. In these times it’s helpful to remember you’re not at the end, but just somewhere along the way. A colleague of mine whom I respect, Ava, has a helpful quote tacked to her bulletin board that reads, “Difficult roads often lead to beautiful destinations.”
So when you’re ready, analyze your failure in search of those valuable moments along the road that will ultimately help get you to that beautiful destination.
Here are some things to consider after failing:
Who helped you along the way? Say thanks for that reference or advice. They didn’t support you because you asked, but because you deserved it and they believed in you.
If someone asked for your assistance in achieving the same goal at which you just failed, what advice would you now give them? What surprised you about the process, or reactions (or lack thereof) from others?
Don’t worry about how the failure reflects on you. To me, and many others, failure looks like you tried to do something great and you will undoubtedly accomplish great things soon.
It may be easy to give up. But giving up doesn’t pay as well as trying again.
Sometimes trying again means trying something new or different than you first attempted. Failure is an opportunity to pivot.
Don’t do anything in response to failure that could hurt your chances at a similar opportunity in the future. Build bridges, don’t burn them. When someone has to close a door, thank them for the experience and before you know it that same someone might be opening that same door and will remember your grace and kindness from before.
You have a finite amount of energy each day. Decide now how much you’ll reserve for mourning and how much you’ll direct toward actively pursuing your next target.
You don’t have to live up to others’ expectations. Your competitive drive should be only you against yourself. Be greater today than you were yesterday. Let others have their expectations – it’s their energy to do with as they please.
Self-care is important. Be careful with your thoughts, as they become actions. If you believe you’re great, you’ll try again. If you believe you’re worthless, you won’t. This can be difficult, but know that you’re not alone and many people who make it look easy were there once too.
Your network should empower you, and inspire you. If it’s discouraging you or bringing you down, it’s time to start unfollowing and disconnecting from your energy vampires. Stay connected to people who will push you farther than you ever imagined.
Some people want you to fail (or are indifferent). It could be insecurity, jealousy, laziness (not doing their part) or any number of issues but the issues are with them not you. While unfortunate that people in power can use it to hold you down or sabotage your chances, it’s important that you’re aware of these bad apples and can attempt to circumvent them when at all possible. If you must interact with them, interact with them publicly or in group settings so others can witness any unfair or dismissive behaviors. Or if you’re in a position to replace a bad performer, make the leap and replace them.
Even when you fail, there’s a lesson to be learned. Are there skills you can develop? Connections you can make? A degree or certification you could pursue? What action would make you more competitive or likely to succeed next time?
What actions did you take that didn’t work out so well? What would you do differently? But also what really worked? What triggered a great response and can be replicated next time around?
What is at the core of your goal? Is it truly getting that specific position or creating a thriving user group? Or maybe it’s getting a foot in the door at a specific company, or building a strong community? Try to identify what you’re truly after and check in with yourself from time to time to make sure the actions you’re taking are getting you closer to that core.
Remember that we often climb the ladder to our destination more quickly with assistance from those with whom we surround ourselves. Are people in your immediate circle holding you down or pushing you upward? Have you made contact with professionals in a position of power or influence that might be able to recommend or endorse you? Don’t be afraid to ask for help.
Try to follow people who are doing something similar to what you want to be doing. Learn from them and their own mistakes. Get to know their secret to success, and what support systems they have built. If nobody is doing what you’re doing, consider yourself a pioneer. Expect an adventure ahead, and be sure to always seek the growth opportunities from failures along the way to make your destination that much more sweet. Someday, and possibly already today, people will consider you a mentor and hope to learn from your successes (and failures).
If you failed, that means you tried. Keep trying, fail when necessary, and ultimately you’ll succeed. The path to your destination won’t always be a straight road and I’ll be here cheering you on around the corners, knowing you’ll make it to your destination soon.
External content types are used to create external lists in SharePoint. Before you can create the list/connection, you must first have created the content type.
2. Select “External Content Types” from the “Navigation menu
3. Select “External Content Type” from the “New” ribbon section
4. Rename the content type by selecting the name and entering a new one.
Connect it to SQL data
1. Select “Click here to discover external data sources and define operations”
2. Click “Add Connection” if you haven’t previously connected to the SQL server
3. Select SQL Server
4. Enter the Server and database names. Select User’s identity (your credentials) or a service account to impersonate (and enter it in Secure Store Application ID). Click OK.
5. SharePoint External lists require at least Read item and read list operations. Right click the table or view to which you’re connecting and select “Create all operations” or choose specific operations if you need to, in order to match data source settings.
6. Click next.
Resolve any errors or warnings. This may mean checking/unchecking required/read-only to match data source settings. You’ll also need to select one field as “Map to Identifier.”
Uncheck any columns you don’t want imported.
Click next again.
7. To filter data pulled in (preventing massive imports), you can optionally add a filter otherwise click Finish.
8. Click “Create Lists & Form,” and “Save” when prompted
9. Name the list and give it a description (optional). Click OK.
10. Check your Site Contents to find your new list.
Applies to SharePoint 2016, can be adapted for O365
If you’re connecting to an external list of significant size, you may run into the following error:
Database Connector has throttled the response. The response from database contains more than ‘2000’ rows. The maximum number of rows that can be read through Database Connector is ‘2000’. The limit can be changed via the ‘Set-SPBusinessDataCatalogThrottleConfig’ cmdlet.
1. Log into your SharePoint server
2. Open your SharePoint 2016 Management Shell as administrator (right-click, run as administrator)
3. Connect to your site
Connect-Site -url https://sharepoint.contoso.com
4. Get ALL service application Proxy IDs (you’ll need this in a later step)
Get-SPServiceApplicationProxy
5. Note the ID of the “Business Data Con…” application
6. Set a new variable “$serviceapp” to that app using the ID you noted as its identity