There are many web tools out there to generate random “lorem ipsum” filler content, but you can do the same thing using Microsoft Word. Simply:
Type =RAND(5) on a line
Hit enter
Instantly, the formula is replaced with five paragraphs of sample content. Replace 5 in the formula with the number of paragraphs you wish you to generate.
You may already be familiar with the concept of @mentioning – it’s generally how we “tag” someone in social media. For example, if you wanted my attention on Mastodon, you might write a post that @mentions my username such as “Hey @chambernate – have you ever run across this error?” This makes sure I get a notification and know to go look at your post.
@mentioning is also how we tag people in Microsoft Teams. When you’re composing a message (whether it’s in a channel, a meeting, or a group chat) you might write “Hey @Nate Chamberlain, can you review this outline?” This achieves the same result as in social media – making sure I get an Activity notification and am more likely to see your post and reply.
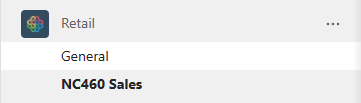
What happens if you don’t @mention someone? No @mention means the chat or channel that you’ve posted in will just be listed in bold for all other members. No activity notification, just a bold channel name or chat name that stays bold until I open that channel or chat, as seen below with NC460 Sales in the Retail team.
NC460 sales is a channel listed in bold, meaning there’s unread activity there.
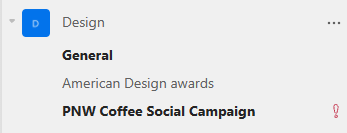
If you mark a message as important, the channel or chat name will still be bold, but will also have an exclamation point as seen with PNW Coffee Social Campaign below.
PNW Coffee Social Campaign has unread activity, and some of that activity includes a message marked as important.
And in chat specifically, you can mark messages as “urgent” which does send activity notifications to recipients every 2 minutes for 20 minutes until they read it (or the 20 minutes ends). While handy as a way to get attention, we want to be careful not to overuse urgent.
In the remainder of this post, I’ll detail the 4 ways to @mention others in Microsoft Teams to get their attention in a direct and professional manner without using urgent:
@mention an individual (i.e. @Diego Siciliani)
@mention a team (i.e. @Human Resources)
@mention a channel (i.e. @Talent Acquisition)
@mention a tag (i.e. @Managers)
Let’s start with @mentioning individuals.
How to @mention an individual
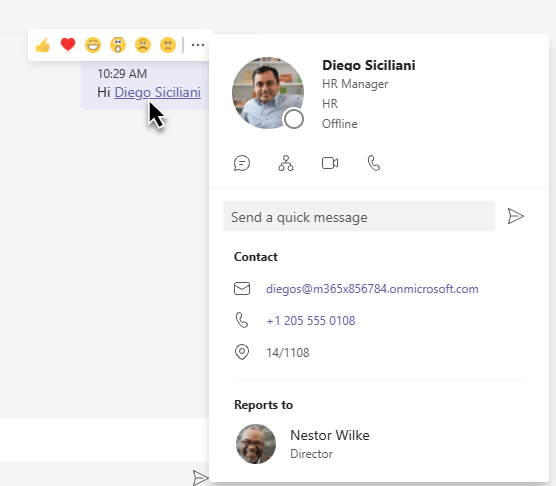
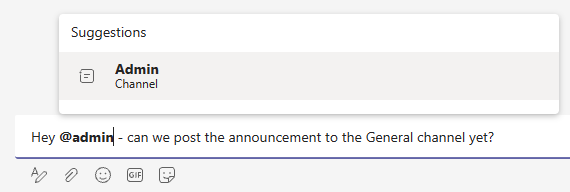
To @mention someone in a chat message or channel conversation post, simply type the “at” sign (@) with no space after it, then begin typing the person’s name. (i.e. typing @Nate would suggest my full name you could then select). Once selected from suggestions, the name should show as a purple hyperlink that, when hovered over, gives you that person’s contact card.
If you’re typing a name and it’s not showing up as a suggestion, it could be they’re not a member of the chat you’re @mentioning them in or, if it’s a channel conversation, they may not be a member of the team to which the channel belongs.
You also don’t have to tag someone’s full name. It can feel overly formal to tag @Nate Chamberlain when you’d rather, more casually, say @Nate. To just use a first name, simply tag the full name as usual, but then backspace to remove the last name – as long as the first name is still purple, they’ll still be tagged but your message reads as more casual and personable.
Click to enlarge – shortening an @mention from full name to first name
@mentioning an individual is the most direct and specific way to get attention and a response from someone.
How (and when) to @mention a team
You can also @mention teams such as @Mark 8 Project Team – this sends an activity notification to every member of the team.
Use this to generally inform all members of your post – just keep in mind that in large teams you may not get the best response from a general @mention like this. The principles of diffusion of responsibility tell us that when 30 people get the same notification, they may feel less responsible for response or action. So to encourage specific action, we want to use more specific @mentions (consider it a form of “knowing your audience”).
Otherwise, @mentioning the entire team is a great way to make broad announcements, share FYIs, etc. where immediate action or response may not be the first priority so much as communicating something.
How (and when) to @mention a channel
You may choose to @mention a specific channel for two reasons:
You want attention from the team on a particular subject
You’re @mentioning members of a private channel (which has unique membership compared to the parent team)
Since standard channels don’t have unique membership from the parent team, an @mention of a particular channel does the same thing as @mentioning the team – every member of the team gets a notification when you @mention a standard channel. The difference is that you’re specifically calling attention to the topic of the channel. For example, if you work for a sales team and your boss mentioned @Sales Team – that’s pretty general and may include 50 people. But if they mention @East Region (a channel in Sales Team), and you happen to help manage the East region, you’re more likely to feel obligated to reply since that’s something in your wheelhouse.
Private channels have unique membership – while the parent team may have 50 members, the private channel can have a subset of that such as 10 of those 50 members. So @mentioning a private channel gives a notification to those 10 members instead of all 50.
Click to enlarge – Admin is a private channel with a subset of members from its parent team.
How to @mention a tag
Since @mentioning standard channels and the team do the same thing functionally, our only option to send activity notifications to subsets of our team members (other than by utilizing private channels) is to use tags.
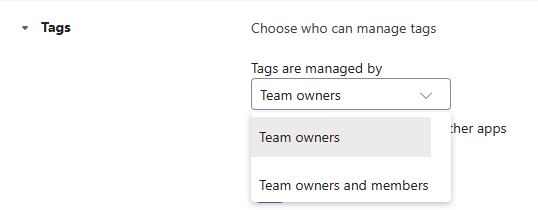
You may need to be a team owner to create tags for your team members – this setting is determined by your team owners via the team’s settings > tags.
Click to enlarge – Team owners who manage your team settings specify who in the team can create/manage tags.
If you have proper permissions, use the team’s ellipsis (the team for which you want to tag members) and choose Manage tags.
Click to enlarge
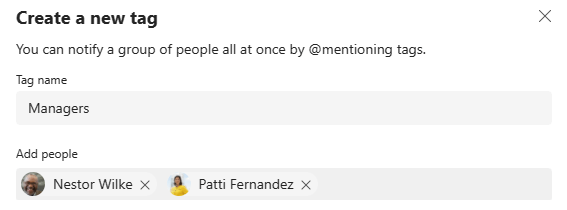
Assuming you don’t yet have any tags to manage, click Create tag.
Add the tag name (i.e. Nurses, Managers, Trainers, etc.) and who should be in that tag. Click Create when finished (you can always add more later).
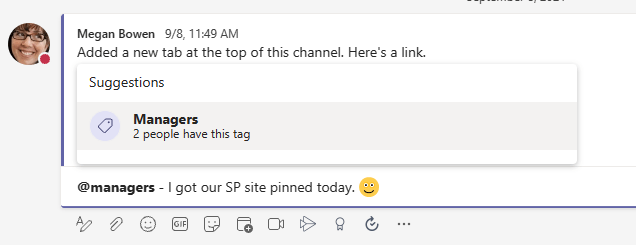
Now when you are creating a post or reply in a channel in that team, you’ll be able to @mention your new tag’s name to notify only the people tagged with that tag. Other team members will still see a bold channel name for unread activity, but won’t receive the activity notification from the @mention. So, in the previous screenshot, Nestor Wilke and Patti Fernandez will each get an activity notification when you @mention Managers.
Click to enlarge
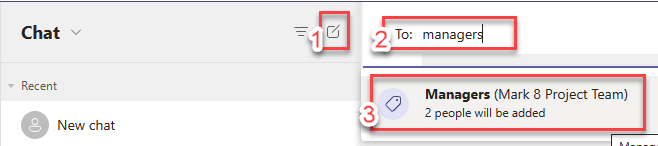
You can also use tags created for your teams as a way to start new chats (Ctrl+N in desktop, or just use the new chat icon when on the chat node of Teams).
Mark Rackley recently tweeted about the ability to create a calculated column in SharePoint online document libraries that would automatically render thumbnails for documents. In the GIF from his tweet, it shows how this works for media files.
— Mark Rackley 🐗 @NACollabSummit @Techsplaining (@mrackley) May 14, 2020
Naturally curious, I had to see how this worked for documents of .docx, .pdf, .pptx, etc. types. What I found is that it only currently supports some file types:
Supported file types (there’s likely even more I didn’t test):
Word (.docx)
PDF (.pdf)
Emails (.msg)
Images (.png, .gif, .jpg, etc.)
Media (.mp4)
Not-yet-supported file types:
Excel (.xlsx)
OneNote (.one)
PowerPoint (.pptx)
Create a thumbnail column in SharePoint Online document libraries
1. Add a new column to your document library (library settings > Create column).
2. Set the column name to Thumbnail. As for type, you have two options:
Leave type as Single line of text. Thanks to Dario Cassinerio for sharing that Single line of text type works as well as (and more simply than) Calculated set to [Title].
Mark Rackley suggests sticking with Calculated set to [Title] (see example screenshot) to prevent users from editing the text field in forms.
3. Click OK.
Supported file types will have thumbnails rendered (like .docx and .pdf in the example below) and others will just be blank (like .pptx and .xlsx in the example below).
Click to enlarge
Here is an animation demonstrating the entire process, start to finish using Single line of text as column type:
Click to enlarge
And another animation but using the Calculated column set to [Title] type:
If you can’t sync a library, or prefer not to, you can pin the web location of a SharePoint form, media, or document library to your “Quick Access” panel in Windows Explorer.
This allows you to interact with (edit, replace, delete) the files just as you would in a network drive but requires that you’re connected to your SharePoint environment – there are no offline files in this method.
Access the library in Windows Explorer
Copy URL of library in SharePoint
Open Windows Explorer and paste in URL, deleting everything after the library name
Hit Enter
Pin to Quick Access
You could then right-click “Quick access” on the left of Windows Explorer and select “Pin current folder to Quick Access” to bookmark it for next time


