By default, your YouTube channel URL is a string of alphanumeric text. For example, mine is https://www.youtube.com/channel/UC0s4qIpcaai5hLoJP-WTsPA. But you can customize this to something more concise and on-brand such as https://www.youtube.com/c/NateChamberlain.
YouTube recently changed the way you customize your channel’s URL. Below I’ll detail the current steps. But before we do, there are some restrictions on who is eligible to change their URL. You can change your URL up to 3 times per year, and are eligible to do so as long as:
- You have 100+ subscribers
- Your channel is 30+ days old
- You’ve uploaded a profile picture
- You’ve uploaded a banner image
Assuming you meet all the criteria listed above, you’re ready to customize your YouTube URL following these steps:
How to get a custom YouTube channel URL
- Sign into YouTube Studio at https://studio.youtube.com/
- Click on Customization from the left-hand navigation menu
- Select Basic info at the top
- Find the Channel URL section, and select Set a custom URL for your channel
- YouTube will suggest a URL based on your channel, or you can type in a completely custom URL.
- Click Publish in the upper-right corner then Confirm.
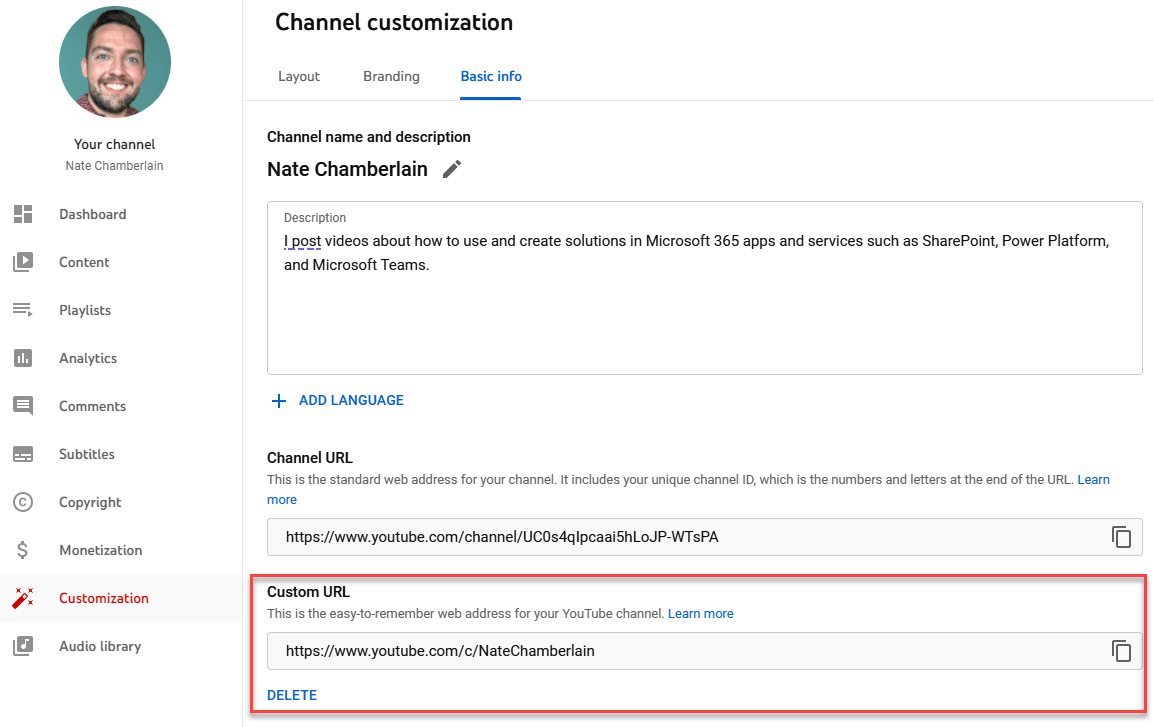
Tip: Shoutout to Shawn Keene for adding that your custom URL has a /c/ in it, but will work without it, too. For example, you may see https://www.youtube.com/c/NateChamberlain in your settings, but you can advertise and promote the URL without /c/ like https://www.youtube.com/NateChamberlain for a cleaner, more professional (and memorable!) URL.
How to change an existing custom YouTube channel URL
To change an existing custom YouTube URL, you’ll first have to delete the one you currently have. Then we can create the new one. Keep in mind you can only change your URL up to 3 times per year. Here are the steps:
- Sign into YouTube Studio at https://studio.youtube.com/
- Click on Customization from the left-hand navigation menu
- Select Basic info at the top
- Find the Channel URL section, and select Delete below your current custom URL
- This redirects you to your Google account. From here, find and select your current YouTube Custom URL in the About section.

- Click Remove.
- Return to YouTube Studio at https://studio.youtube.com/. If you’re already on Customization > Basic info, skip to step 10. You may need to refresh the page if your old URL is still shown.
- Click on Customization from the left-hand navigation menu
- Select Basic info at the top
- Find the Channel URL section, and select Set a custom URL for your channel
- YouTube will suggest a URL based on your channel, or you can type in a completely custom URL.
- Click Publish in the upper-right corner then Confirm.
Learn more at Google’s support page for custom YouTube URLs.